Singer Simple Machine Manual: A Comprehensive Guide (Updated 02/06/2026)
Welcome! This manual‚ updated today – 02/06/2026 – offers detailed operating instructions for beginners using the Singer Model 345 sewing machine.
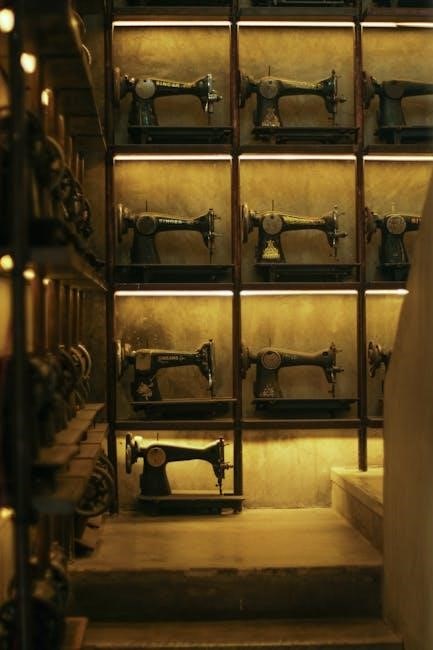
Singer Simple Machines represent a legacy of accessible and reliable sewing technology. For generations‚ Singer has empowered both novice and experienced sewists with machines designed for ease of use and durability. This manual focuses on the Model 345‚ a testament to Singer’s commitment to straightforward functionality.
These machines are ideal for a wide range of projects‚ from basic garment construction and alterations to quilting and crafting. The simplicity of operation doesn’t compromise quality; Singer Simple Machines deliver consistent stitch performance. This guide will walk you through every step‚ ensuring you can confidently unlock your machine’s potential.
We aim to provide a comprehensive resource‚ helping you navigate the features and capabilities of your Singer Model 345‚ starting your sewing journey with confidence and success.
Understanding Your Singer Model 345
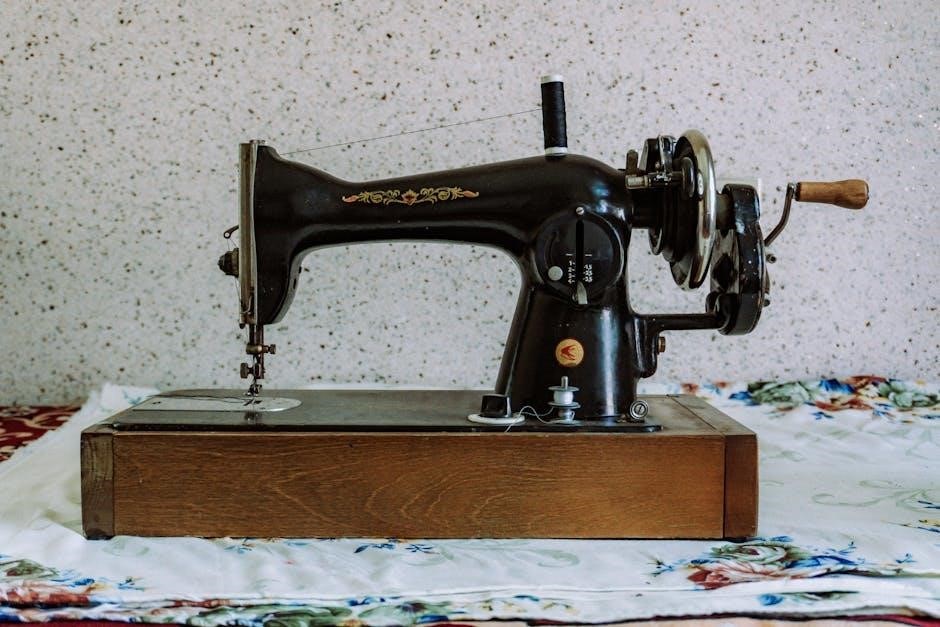
The Singer Model 345 is a mechanical sewing machine celebrated for its user-friendly design and robust construction. It’s specifically engineered for beginners‚ offering a gentle learning curve without sacrificing sewing power. This model prioritizes essential stitches and straightforward operation‚ making it perfect for everyday sewing tasks.
Unlike computerized machines‚ the Model 345 relies on manual controls‚ fostering a deeper understanding of the sewing process. Familiarizing yourself with these controls – the handwheel‚ stitch length dial‚ and reverse lever – is key to mastering your machine. This manual will detail each component‚ providing clear instructions for optimal performance.
Prepare to explore a reliable and versatile machine designed to bring your creative visions to life!
Key Components and Their Functions
Your Singer Model 345 comprises several essential parts working in harmony. Understanding each component’s role is crucial for successful sewing; The handwheel controls the needle’s movement‚ while the flywheel maintains momentum. The needle and needle clamp securely hold the needle‚ driving it through the fabric.
The presser foot and shank apply pressure to the fabric‚ ensuring even feeding. The bobbin winder fills the bobbin with thread‚ and the bobbin case houses it‚ creating the lower stitch. These components interact to form each stitch.
This section will delve into each part‚ explaining its function and how to properly utilize it for optimal sewing results. Proper understanding ensures smooth operation and longevity of your machine.
The Handwheel and Flywheel
The handwheel is your primary control for needle positioning. Turning it clockwise lowers the needle‚ while counter-clockwise raises it. It allows for precise‚ manual stitching and is essential for starting and stopping. The flywheel‚ a larger wheel connected to the handwheel‚ provides momentum‚ ensuring smooth and consistent needle movement.
Its weight and design contribute to the machine’s rhythmic operation. Always turn the handwheel towards you to maintain control and prevent accidental needle injuries. Never force the wheel; resistance indicates a potential issue. Understanding their combined function is key to mastering your Singer 345.
Regularly check for smooth rotation; any stiffness should be addressed promptly.
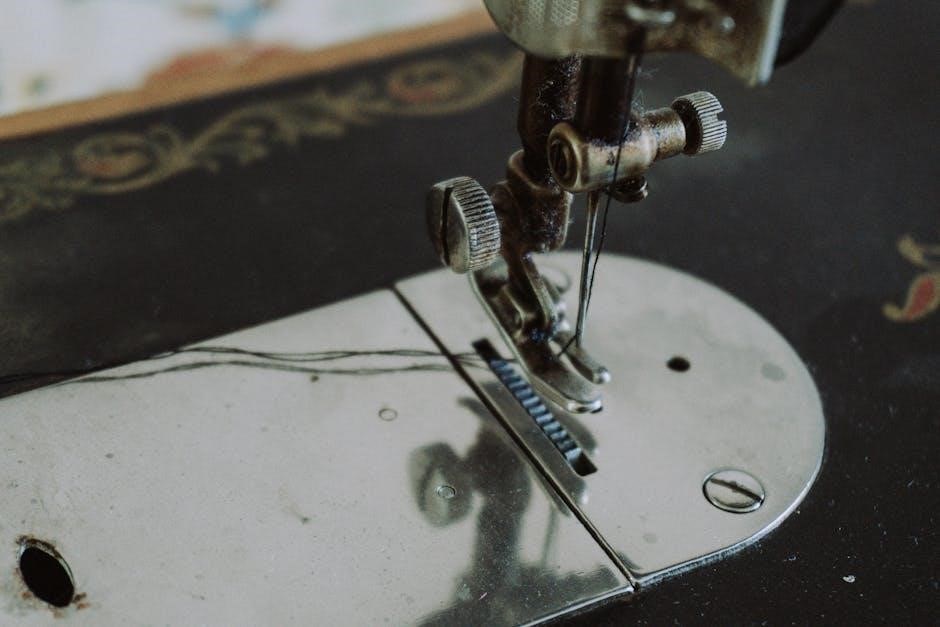
The Needle and Needle Clamp
The needle is the heart of the sewing process‚ piercing fabric to create stitches. Singer 345 machines require specific needle types (size and system) based on fabric weight and type – consult your accessory kit. The needle clamp securely holds the needle in place.
To change the needle‚ always ensure the machine is powered off. Loosen the needle clamp screw‚ remove the old needle‚ and insert a new one with the flat side facing the back. Tighten the screw firmly‚ but avoid over-tightening. A loose needle can cause skipped stitches or damage the machine.
Regularly inspect the needle for bends‚ burrs‚ or damage. A damaged needle should be replaced immediately.
The Presser Foot and Shank
The presser foot maintains consistent pressure on the fabric while sewing‚ ensuring even stitch formation. Your Singer 345 likely comes with a standard zig-zag foot‚ suitable for most applications. The shank is the metal stem that connects the presser foot to the machine.
Changing presser feet is simple: loosen the screw on the shank‚ remove the existing foot‚ and attach the desired foot. Ensure it clicks securely into place before tightening the screw. Different presser feet are available for specialized tasks like zippers‚ buttonholes‚ or quilting.
Proper presser foot selection and secure attachment are crucial for optimal sewing performance and fabric handling.
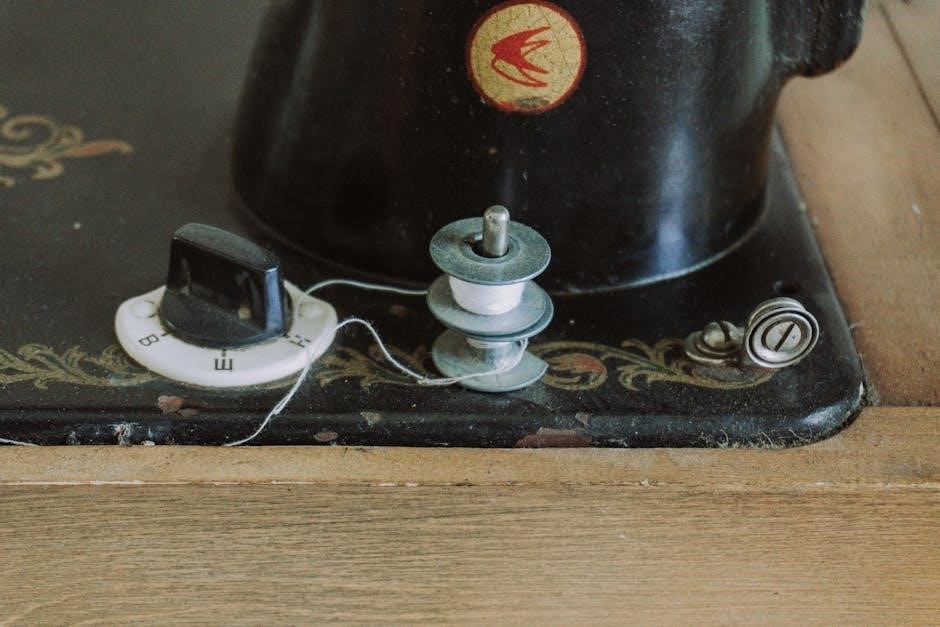
The Bobbin Winder and Bobbin Case
The bobbin winder fills the bobbin with thread‚ essential for creating the lower stitch. Engage the bobbin winder by sliding the bobbin onto the winder spindle and following the threading path indicated on your Singer 345.
The bobbin case holds the bobbin within the machine. It’s crucial to insert the bobbin correctly‚ ensuring the thread unwinds in the proper direction. A properly seated bobbin case guarantees smooth and consistent stitching.
Regularly check the bobbin thread level and replace it when low. Incorrect bobbin winding or insertion can lead to tension issues and poor stitch quality.
Setting Up Your Singer Simple Machine
Preparing your Singer Model 345 for sewing is straightforward. Begin by ensuring the machine is placed on a stable‚ level surface. Next‚ connect the power cord (if applicable) and switch the machine on.
Before starting‚ familiarize yourself with the threading path – a critical step for proper stitch formation. This involves guiding the thread from the spool‚ through tension discs‚ and finally to the needle.
Simultaneously‚ wind a bobbin with matching thread‚ as a filled bobbin is necessary for the lower stitch. Correct setup ensures optimal performance and prevents common sewing frustrations.
Threading the Machine (Step-by-Step)
Begin with the spool pin‚ placing your thread spool securely. Guide the thread down through the first thread guide‚ ensuring it seats correctly. Next‚ lead the thread around the tension discs – this controls stitch quality.
Continue threading through the take-up lever‚ then down and around the needle bar thread guide. Finally‚ thread the needle from front to back.
Important: Always raise the presser foot before threading to release tension. A properly threaded machine is crucial for consistent‚ even stitches. Double-check each step to avoid skipped stitches or tangling.
Winding the Bobbin
Start by placing the bobbin onto the bobbin winder spindle. Ensure it clicks into place securely. Next‚ guide the thread from the spool‚ around the tension disc‚ and then onto the bobbin.
Engage the bobbin winder by sliding it to the right. Gently press the foot pedal to begin winding. The machine will automatically stop when the bobbin is full.
Important: Don’t overfill the bobbin! This can cause issues with stitch quality. Once full‚ disengage the bobbin winder and trim the thread. A consistently wound bobbin ensures smooth‚ even sewing.
Basic Sewing Techniques
Embark on your sewing journey with these fundamental techniques! Mastering these skills will unlock a world of creative possibilities with your Singer Simple Machine. We’ll begin with the foundational straight stitch‚ essential for seams and basic construction.
Practice maintaining a consistent seam allowance – the distance between the needle and the fabric edge. This ensures neat and professional results. Next‚ learn reverse stitching‚ crucial for securing the beginning and end of seams‚ preventing unraveling.
Backtracking‚ as it’s often called‚ adds durability to your projects. Consistent practice builds muscle memory and confidence!
Straight Stitching: A Beginner’s Guide
Let’s master the straight stitch! This is the cornerstone of most sewing projects. Begin by threading your Singer Model 345 correctly (refer to the threading guide). Ensure your fabric is placed under the presser foot‚ aligned with your desired seam allowance.
Gently lower the presser foot to secure the fabric. Slowly rotate the handwheel towards you‚ observing the needle pierce the fabric and create a stitch. Maintain a consistent speed for even stitches. Guide the fabric gently; avoid pulling or pushing.
Practice on scrap fabric first! Aim for a straight‚ even line. Consistent practice is key to achieving professional-looking seams. Remember to backstitch at the beginning and end.
Reverse Stitching and Backtracking
Securing your seams is crucial! Reverse stitching‚ often called backtracking‚ reinforces the beginning and end of a seam‚ preventing unraveling. On your Singer Model 345‚ locate the reverse lever or button – typically positioned near the handle.
Begin your seam with a straight stitch as previously learned. Once you reach the starting point‚ engage the reverse lever. Slowly stitch backwards over approximately half an inch of your initial stitches.
Release the reverse lever and continue stitching forward. Repeat this process at the end of your seam. Consistent backtracking ensures a durable and professionally finished project. Practice this technique to build confidence and achieve strong seams.
Troubleshooting Common Issues
Encountering problems? Don’t worry! This section addresses frequent issues with your Singer Model 345. Many sewing frustrations have simple solutions. Before seeking professional help‚ systematically check the basics: threading‚ bobbin winding‚ and needle insertion.
Common problems include thread breakage‚ skipped stitches‚ and machine jamming. Often‚ these stem from incorrect threading or a dull needle. Always use the correct needle type for your fabric.

Regular cleaning and lubrication (covered later) also prevent many issues. If problems persist‚ consult the specific troubleshooting guides for thread breakage‚ skipped stitches‚ and jamming in the following sections.

Thread Breakage Problems
Frequent thread breakage is frustrating‚ but often easily fixed. First‚ re-thread the machine‚ ensuring the presser foot is up during threading – this opens the tension discs. Verify the thread path is clear of obstructions.
Next‚ check the needle. A bent or dull needle is a primary cause. Replace it with a new‚ appropriate needle for your fabric weight. Ensure the needle is correctly inserted‚ with the flat side facing the back.
Incorrect tension settings can also cause breakage. Experiment with slightly loosening the upper tension. Finally‚ confirm you’re using quality thread. Cheap thread is prone to snapping.
Skipped Stitches and Their Causes
Skipped stitches indicate a problem with the loop formation. The most common culprit is an incorrectly inserted or damaged needle. Always ensure the needle is fully inserted and the correct type for your fabric. A blunt or bent needle must be replaced.
Incorrect threading is another frequent cause. Double-check the threading path‚ ensuring the thread is properly seated in the tension discs and guides. Also‚ verify the bobbin is correctly inserted and the bobbin thread is flowing smoothly.
Finally‚ fabric issues can contribute. Thick or very stretchy fabrics may require a different needle and slower sewing speed. Adjust accordingly!
Machine Jamming and How to Resolve It
A jammed sewing machine usually means tangled threads are blocking the mechanism. Immediately stop and never force the handwheel. Gently remove the bobbin case and carefully untangle any knotted threads. Inspect the bobbin area for lint and debris‚ cleaning it thoroughly.
Next‚ check the needle area. Remove the needle and look for wrapped thread. Re-thread the upper thread‚ ensuring it’s correctly seated in all guides and the tension discs.
If jamming persists‚ a small amount of lubricant on key moving parts (avoiding the bobbin area) can help. Always consult the maintenance section before lubricating.
Maintenance and Care
Regular maintenance ensures your Singer Simple Machine operates smoothly for years. Dust and lint buildup are the primary enemies! After each use‚ brush away loose debris from the bobbin area and feed dogs using the provided brush.
Periodically (every 6-12 months‚ depending on usage)‚ a more thorough cleaning is needed. Disconnect the power (if applicable) and use a lint brush or compressed air to remove lint from all internal areas.
Lubrication is crucial‚ but use sewing machine oil specifically. Apply a few drops to the motor and moving parts as detailed in the lubrication section. Avoid over-oiling!
Cleaning Your Singer Machine
Consistent cleaning prevents malfunctions and extends your machine’s life. Begin by disconnecting the power source. Use the brush accessory to remove lint and dust from the bobbin case‚ feed dogs‚ and surrounding areas after every sewing session.
For deeper cleaning‚ access the internal components. A small vacuum cleaner with a brush attachment can effectively remove stubborn lint. Pay close attention to the needle plate and shuttle hook area.
Wipe down the exterior with a soft‚ damp cloth. Avoid harsh chemicals or abrasive cleaners‚ as they can damage the finish. Never lubricate before cleaning!
Lubrication Best Practices
Proper lubrication ensures smooth operation and prevents wear. Only use sewing machine oil specifically designed for this purpose; other oils can gum up the mechanism.
Oil key areas after cleaning – the bobbin race‚ shuttle hook‚ and all moving parts accessible around the needle bar and presser foot bar. Apply oil sparingly‚ one drop at a time‚ and wipe away any excess.
Avoid over-oiling‚ as this attracts dust and lint. Refer to your Singer Model 345’s diagram (if available) for specific lubrication points. Regular‚ light oiling is far more effective than infrequent‚ heavy applications.
Advanced Features (If Applicable to Model 345)
The Singer Model 345‚ while a simple machine‚ may include a few enhanced capabilities. These could involve adjustable stitch length‚ offering versatility for different fabric weights and project needs.
Some models feature a built-in needle threader‚ simplifying a potentially frustrating step for beginners. Check your machine’s specific documentation to confirm if this feature is present.
Additionally‚ a free arm functionality might be available‚ facilitating easier sewing of cuffs‚ sleeves‚ and other cylindrical items. Explore your machine thoroughly to discover all its potential‚ and consult online resources for user tips.
Resources and Further Learning
Expand your sewing knowledge beyond this manual! Singer’s official website (Singer’s Official Website and Support) provides a wealth of information‚ including downloadable manuals‚ FAQs‚ and troubleshooting guides. You’ll also find accessory information and potential replacement parts.
For peer-to-peer support and inspiration‚ explore vibrant online forums and sewing communities. These platforms offer a space to ask questions‚ share projects‚ and learn from experienced sewers.
YouTube is a fantastic resource‚ hosting numerous video tutorials demonstrating various sewing techniques and machine maintenance procedures. Don’t hesitate to seek out these supplemental learning tools!
Singer’s Official Website and Support
Your primary online resource is Singer’s official website! (www.singer.com). Here‚ you can directly access digital versions of your Singer Simple Machine Model 345 manual‚ ensuring you always have the latest information at your fingertips.
The support section offers a comprehensive FAQ database addressing common issues and providing step-by-step solutions. You can also find detailed diagrams and parts lists for your machine.
Need to contact Singer directly? The website provides contact information for customer service‚ allowing you to reach out via phone or email for personalized assistance. Explore their accessory store for compatible parts and feet!
Online Forums and Sewing Communities
Expand your knowledge and connect with fellow sewing enthusiasts! Numerous online forums and communities are dedicated to Singer sewing machines‚ offering a wealth of shared experience and troubleshooting advice.
These platforms are invaluable for asking specific questions about your Model 345‚ sharing projects‚ and learning new techniques. Search online for “Singer sewing machine forums” or “sewing communities” to discover active groups.
Benefit from the collective wisdom of experienced users who have likely encountered and solved similar issues. Many communities also host tutorials and offer pattern recommendations. Remember to be respectful and contribute positively to these helpful spaces!